The Excel add-in allows you to quickly and automatically check entities (contractors) using the Excel spreadsheet in terms of their current status in the VIES system.
This chapter contains instructions on how to integrate the Microsoft Excel application with the VIES API system. The provided add-in has been successfully tested in the following versions of MS Excel: 2007, 2010, 2013, 2016, 2019 (on the Windows and MacOS operating systems) and 2021 (on the Windows and MacOS operating systems) and the web version of Excel365.
The latest version of the add-on for Excel 2007, 2010, 2013, 2016 and 2019 is always available for download from the Download page. The add-on can be installed in both 32-bit and 64-bit versions of Excel. Attention! Select the version (32 or 64 bit) that matches the version of Excel, not the operating system.
To download and install the add-on for MacOS and Excel 2021 for Windows and Excel365, please visit the official Microsoft store: https://appsource.microsoft.com.
The full functionality of the Excel add-in can be checked – without the need to create an account – using the provided Test API. The page also describes how to configure an Excel add-in for use in the API provided for testing.
Using the add-in in the production API requires setting up an account on the viesapi.eu website, purchasing a minimum of the Business plan and generating a key and its identifier. The process of registering and setting up an account as well as generating keys has been described on the Documentation website.
Installation and configuration for MS Excel 2021 and Excel 365 from Microsoft Store (AppSource)
Installation
After entering the Microsoft Official Store website https://appsource.microsoft.com, click the Get it now button.

A login window will be displayed in which you must enter the e-mail address for which you have created an account with Microsoft (private or corporate). If you do not have such an account, you can create one and continue the installation process or stop the installation and use the option to install the add-on in one of the ways described above.
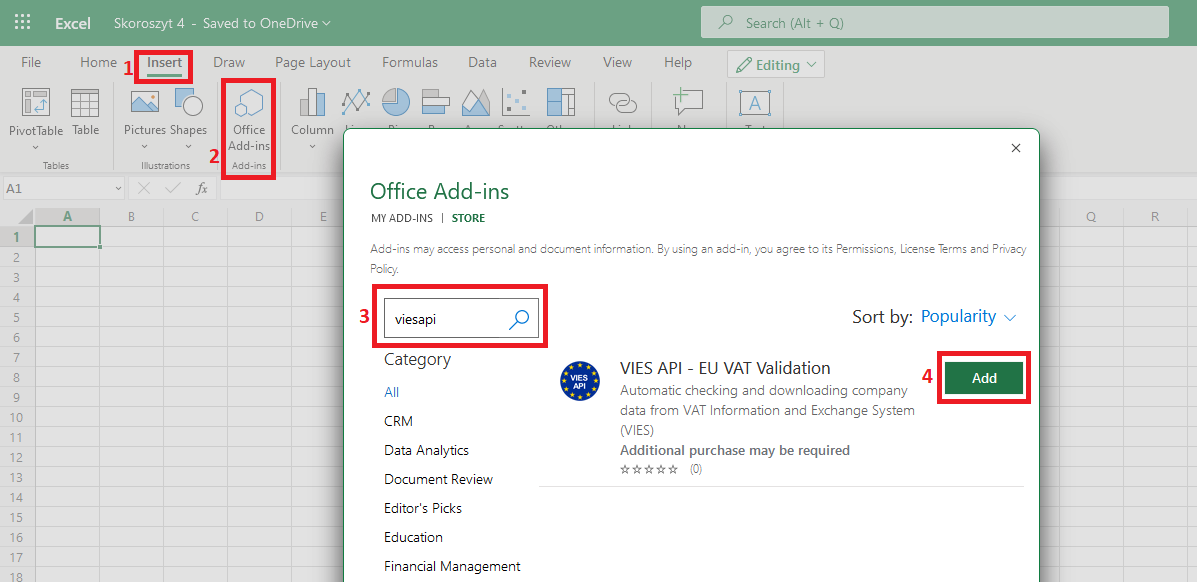
To download and install the add-in from the Excel 2021 or Excel 365 (web), go to the Insert [1] tab, find the Add-ins section and click the OfficeAdd-ins [2] button. Then, in the opened window, enter the word ‘viesapi ′ [3] in the search field and press the magnifying glass icon. An add-on called “VIES API - EU VAT Validation” should be found, which should be installed by clicking the Add button [4]. All the steps above are illustrated in the screenshot below:
After clicking the Add button, a screen should appear where you can read the license terms and privacy protection rules.
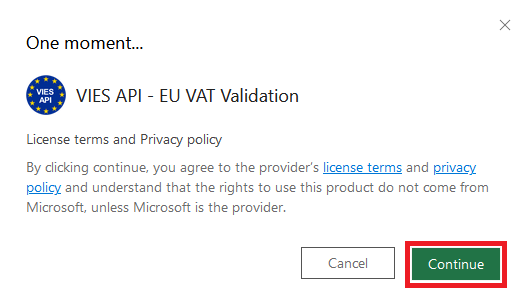
To start install add-in, press Continue button.
Configuration
After correctly installing the plugin, you should see a screen similar to the one presented below. In the Home menu [1], find the icon representing the VIES API Panel [2] and click on it to display the side panel. Immediately after installation, the add-in is configured to work in a test environment – details on the Test API page. Using the add-on in the test mode does not require creating an account on the viesapi.eu website.
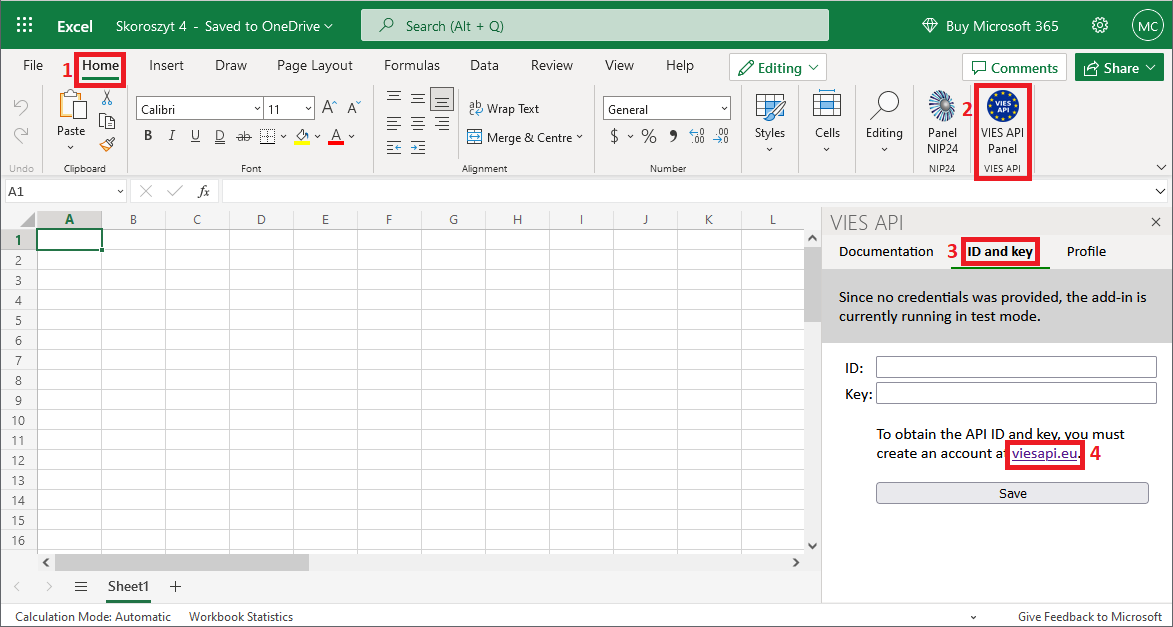
In order to switch the add-on to the production environment, click on the ID and key [3] tab and enter the Key and key ID, which you can find after logging in to your account on the viesapi.eu website in the “API Keys” tab. After entering both values, press the Save button.
If you do not have an account on our website yet, click the link at viesapi.eu [4] and go through the registration process, which is described in detail on the Documentation page.
Installation and configuration for Excel: 2007, 2010, 2013, 2016 and 2019
Installation
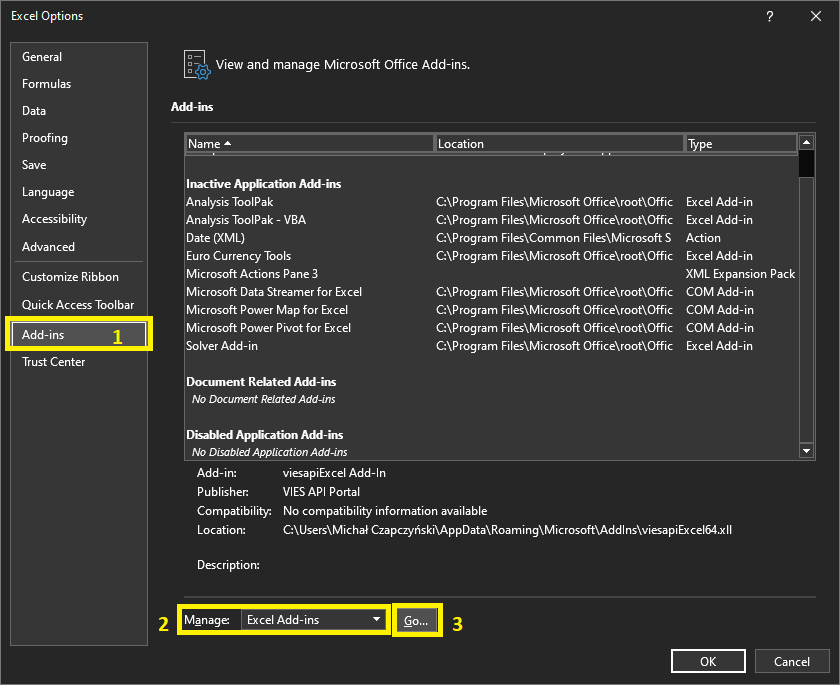
Get the latest version of the add-in for Excel 2007, 2010, 2013, 2016 and 2019 from the Download page. Launch MS Excel and go to File> Options, then select Add-ins [1] from the menu.
At the bottom of the settings, select Excel Add-ins [2] and click the Go [3] button.
Advanced users can add an add-on from the Developer tab [1], then click Excel Add-ins [2] and click the Browse [3] button:
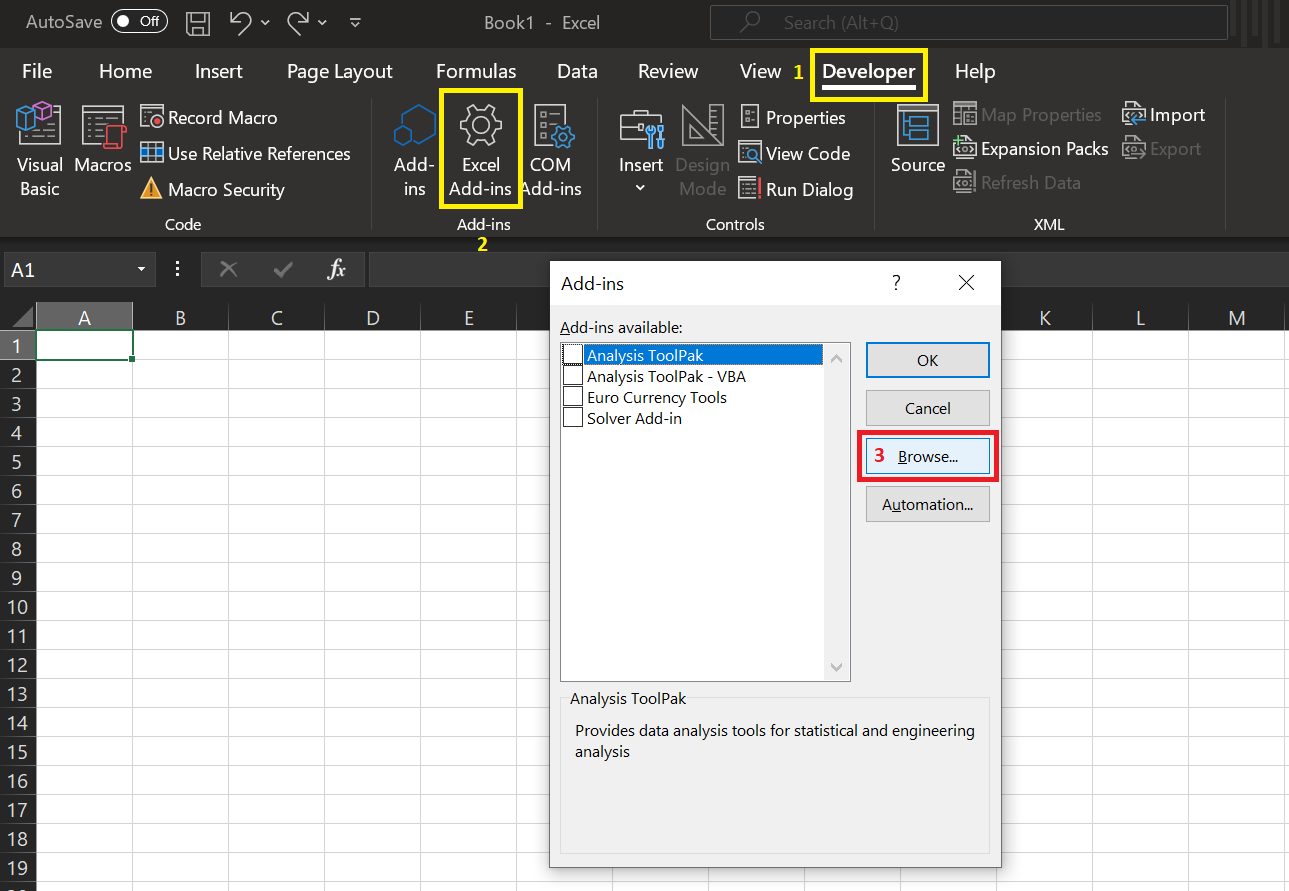
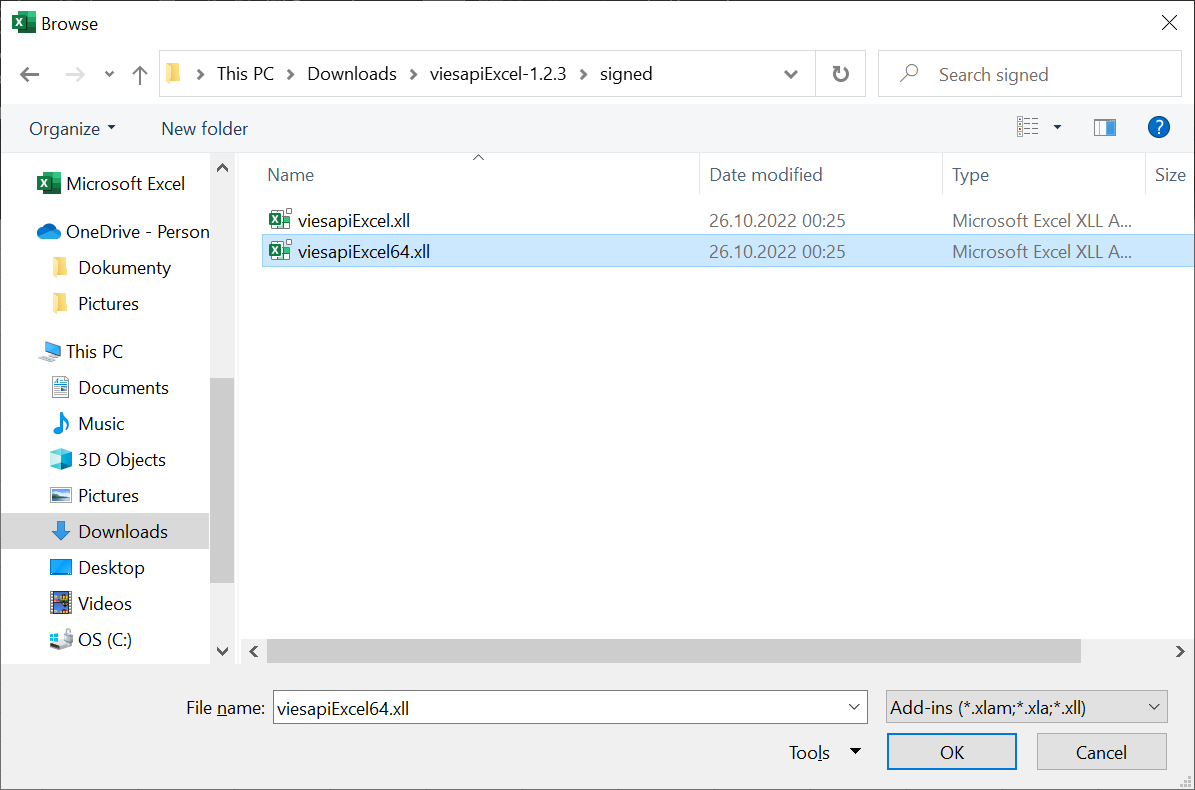
In the Add-ins window, click the Browse button, go to the directory where the viesapi-ms-excel-addin-version-number.zip file was unpacked and select:
viesapiExcel.xll– for the 32-bit version of Excel,viesapiExcel64.xll– for the 64-bit version of Excel.
The correct loading of the add-in is shown in the figure below [1].
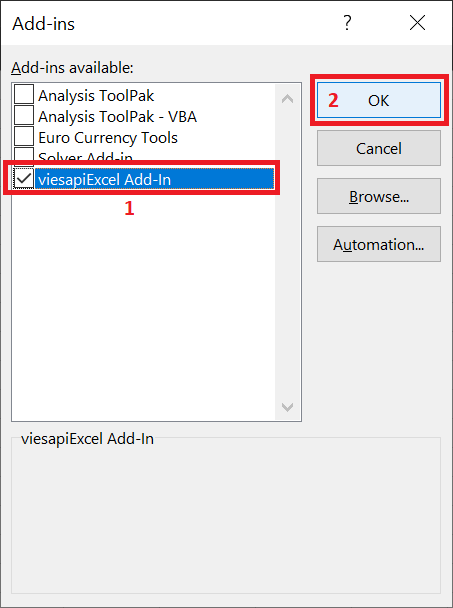
It is enough to click the OK button [2] to make the functions implemented in the add-in available in Excel.
Configuration
After installation, the plugin is set to the test environment by default (more details on Test API page). To be able to call out functions in the production environment, it is necessary to configure access to the viesapi.eu website once. To do this, go to any Excel spreadsheet and perform the function:
=VIESAPI.CONNECT.PRODUCTION("identifier";"key")
where the function parameters are:
identifier– the parameter should contain the identifier (ID) generated on the account on the viesapi.eu website,key– the parameter should contain the Key generated on the account on the viesapi.eu website.
Details on generating the identifier and key are described on the Documentation website.
In order to verify the correctness of the connection with a given API (test or production), the following function should be performed:
=VIESAPI.CONNECT.STATUS()
Which can return values:
SUCCESS: Production– if the add-in is correctly configured to work with the production environment,SUCCESS: Test– if the add-in is correctly configured to work with the test environment,
ERROR: Connection requires configuration– in case of a wrong configuration.
By default, every Excel document is set to automatically calculate the spreadsheet. Setting this option implies that all formulas are called when changes are made that affect the formula. An example of this is to delete a row on a worksheet.
In order to avoid the automatic invocation of all functions defined in a given sheet, which is related to the automatic sending of queries to the API of the veisapi.eu website, change the workbook calculation option to Manual:
- From the
Filemenu, selectOptions - Highlight the
Formulastab - In the Calculation Options section, select the setting:
Manualand uncheck the additional option:Recalculate the workbook before saving. - It is necessary to save the changes made in the sheet.
With the Excel spreadsheet configured in such a way, in order to force the refreshing of all defined formulas, press the key combination:
CTRL + ALT + SHIFT + F9
Update the plugin to the latest version
Attention!The following procedure for updating the Excel add-in works correctly for MS Excel 2019, 2021 and Excel 365 versions, where the add-in can be installed from the Microsoft Store.
Attention! After installing the latest version, you must reconfigure the add-on, i.e. enter and save the ID and key.
To install the latest version of the Excel add-in, follow these steps:
1. Check the version of the installed add-in by calling the formula =VIESAPI.VERSION(). The latest version of the add-on is 1.2.8
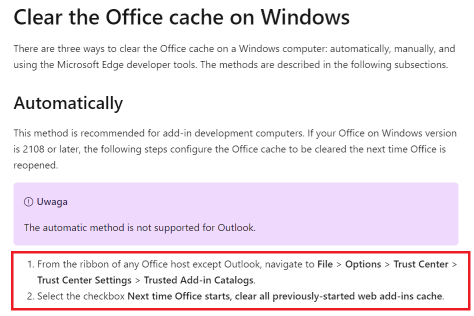
2. Clearing the MS Excel cache, according to the procedure described on the official documentation page: https://learn.microsoft.com/en-us/office/dev/add-ins/testing/clear-cache
3. After completing all steps from point 2, restart the MS Excel application.
4. During restart, the MS Excel application will download the latest version of the add-in from the Microsoft Store.
5. Configure the add-on by entering the ID and key downloaded after logging in to your account on our website – “API Keys” tab.
Usage
Watch how to automatically and massively verify EU VAT status of companies in the VIES system using our Excel add-in:
Before using the add-on, you should familiarize yourself with the specifics of its operation:
- All function calls are executed in asynchronous mode, which does not cause the freezing (no response) effect of the Excel application.
- Adding (inserting) a row or column does not refresh all defined function calls.
- Copying or moving cells that contain functions does not refresh defined function calls.
- Deleting a row or column will refresh all defined function calls and send queries to viesApi.eu (only in the case of default Excel settings). The description of changing the default settings is included in the Configuration chapter.
- Attention! It is not recommended to run more than 500 parallel queries because Excel is having trouble handling a large number of asynchronous calls.
Get company data from VIES
VIESAPI.VIES.DATA() – The function retrieves all available company data directly from the VIES system. The parameters should be:
- European tax identification number (VAT EU),
- (optional)
FORMATof the returned data (see: Tags that can be used as theFORMATparameter).
=VIESAPI.VIES.DATA("PL7171642051")
If you only need company status in VIES, please use the following query:
=VIESAPI.VIES.DATA("PL7171642051";"$(Valid)")
If the returned status is Yes, it means that the company has a valid EU VAT number.
Tags available in the VIESAPI.VIES.DATA function that can be used as the FORMAT parameter:
$(UID)– unique identifier generated by the viesApi.eu service$(CountryCode)– country code$(VATNumber)– european VAT number$(Valid)– response from the VIES service, informing about the current EU VAT status of the checked company (Yes/No)$(TraderName)– company registration name$(TraderCompanyType)– business type$(TraderAddress)– trader address where the company is registered$(ID)– unique identifier generated by the VIES system (consultation number)$(Date)– the date the response was generated$(Source)– the source of the data
Default format: "$(TraderName), $(TraderAddress)"
If the string "JSON" is given as the FORMAT parameter, the function will return the complete result in the form of a JSON string, which can be freely parsed and processed further:
=VIESAPI.VIES.DATA("PL7171642051";"JSON")
Get parsed company data from VIES
VIESAPI.VIES.DATA.PARSED() – The function retrieves all available company data directly from the VIES system. In addition, company’s name and address are returned as parsed data splitted into separate attributes. The parameters should be:
- European tax identification number (VAT EU),
- (optional)
FORMATof the returned data (see: Tags that can be used as theFORMATparameter).
=VIESAPI.VIES.DATA.PARSED("PL7171642051")
If you only need company status in VIES, please use the following query:
=VIESAPI.VIES.DATA.PARSED("PL7171642051";"$(Valid)")
If the returned status is Yes, it means that the company has a valid EU VAT number.
Tags available in the VIESAPI.VIES.DATA.PARSED function that can be used as the FORMAT parameter:
$(UID)– unique identifier generated by the viesApi.eu service$(CountryCode)– country code$(VATNumber)– european VAT number$(Valid)– response from the VIES service, informing about the current EU VAT status of the checked company (Yes/No)$(TraderName)– company registration name$(TraderNameComponents.Name)– company name from traderName (without legal form)$(TraderNameComponents.LegalForm)– name of legal form extracted from traderName (without company name)$(TraderNameComponents.LegalFormCanonicalId)– dictionary identifier of legal form$(TraderNameComponents.LegalFormCanonicalName)– dictionary name of legal form$(TraderCompanyType)– business type$(TraderAddress)– trader address where the company is registered$(TraderAddressComponents.Country)– name of the trader country in its national language$(TraderAddressComponents.PostalCode)– postal code of the trader’s address$(TraderAddressComponents.City)– city of the trader’s address$(TraderAddressComponents.Street)– street of the trader’s address$(TraderAddressComponents.StreetNumber)– street building number of the trader’s address$(TraderAddressComponents.HouseNumber)– apartment/office number of the trader’s address$(TraderAddressComponents.Other)– other address details (area name, building name, floor number, etc.)$(ID)– unique identifier generated by the VIES system (consultation number)$(Date)– the date the response was generated$(Source)– the source of the data
Default format: "$(TraderName), $(TraderAddress)"
If the string "JSON" is given as the FORMAT parameter, the function will return the complete result in the form of a JSON string, which can be freely parsed and processed further:
=VIESAPI.VIES.DATA.PARSED("PL7171642051";"JSON")
User account status check (free of charge)
VIESAPI.ACCOUNT.STATUS() – The function returns basic information about the plan currently used by the user. The parameters should be:
- (optional)
FORMATof the returned data (see: Tags that can be used as theFORMATparameter)
=VIESAPI.ACCOUNT.STATUS()
Attention! Calling the function does not increase the number of queries made.
The tags available in the VIESAPI.ACCOUNT.STATUS function can be used as the FORMAT parameter:
$(UID)– unique identifier generated by the viesApi.eu service$(BillingPlanName)– name of the current plan$(SubscriptionPrice)– monthly subscription fee$(ItemPrice)– cost of a single query outside the plan$(ItemPriceStatus)– cost per query – VAT/VIES/Company activity status$(ItemPriceParsed)– cost per query – VAT/VIES/Company activity status with parsed data$(Limit)– maximum number of queries in the plan$(RequestDelay)– minimum time interval between queries$(DomainLimit)– maximum number of domains (API keys)$(OverPlanAllowed)– ability to exceed the maximum number of queries in the plan$(ExcelAddIn)– access to the MS Excel add-in$(Stats)– access to query statistics$(NIPMonitor)– access to monitoring of companies’ status: VAT/VIES/Activity status$(FuncGetVIESData)– access to functions that verify company status in the VIES system$(FuncGetVIESDataParsed)– access to functions that verify company status in the VIES system and parse the trader’s name and address$(VIESDataCount)– number of VIES queries performed this month$(VIESDataParsedCount)– number of VIES queries with parsed data performed this month$(TotalCount)– total number of queries performed this month
Default FORMAT: "Name of the current tariff plan: $(BillingPlanName), Monthly subscription net price: $(SubscriptionPrice), Maximum number of inquiries in the plan: $(Limit), Total number of queries made in the current month: $(TotalCount)"
If the string "JSON" is given as the FORMAT parameter, the function will return the complete result in the form of a JSON string, which can be freely parsed and processed further.
VIES system status check (free of charge)
VIESAPI.VIES.STATUS() – This function allows you to verify the current status of the VIES system. It returns an overall status indicating availability, as well as a list of individual member countries together with the current availability status of their national systems. The parameters should be:
- (optional)
FORMATof the returned data (see: Tags that can be used as theFORMATparameter)
=VIESAPI.VIES.STATUS()
Attention! Calling the function does not increase the number of queries made.
The tags available in the VIESAPI.VIES.STATUS function can be used as the FORMAT parameter:
$(UID)– unique identifier generated by the viesApi.eu service$(Available)– current availability of VIES system (Available, Partially available, Unavailable)$(Countries)– list of individual member countries’ states (Available, Unavailable)$(AT), $(FR), $(PL), etc.– availability status of a specific member country (use 2-letter upper case country code as tag value)
Default FORMAT: "$(Available)"
If the string "JSON" is given as the FORMAT parameter, the function will return the complete result in the form of a JSON string, which can be freely parsed and processed further.
Other useful functions (free of charge)
VIESAPI.ACCOUNT.STATUS.TOTAL() – The function returns information about the total number of inquiries made in the current billing month for a given account (all API keys). Returns exactly the same number as the $(TotalCount) tag in the VIESAPI.STATUS.ACCOUNT() function.
VIESAPI.ACCOUNT.STATUS.LIMIT() – The function returns information about the maximum number of queries available in the plan selected by the user. Returns exactly the same number as the $(Limit) tag in VIES.STATUS.ACCOUNT() function
VIESAPI.EUVAT.NORM() – This feature corrects and formats EU VAT number (removes spaces and hyphens etc.) offline and does not retrieve any data from VIES:
=VIESAPI.EUVAT.NORM("PL 717-164-20-51")
VIESAPI.EUVAT.VALID() – The function only checks the correctness (syntax, checksum) of the EU VAT number offline and does not retrieve any data from the VIES system. Returns TRUE if the number is valid or FALSE if it is not valid:
=VIESAPI.EUVAT.VALID("PL7171642051")
VIESAPI.CONNECTION.STATE() – The function returns current status of add-in configuration.
If the function returns the following value, it means, among others that the ID and API key were not saved:
ERROR: Connection requires configuration
After saving the API ID and key, the function should return the following message:
SUCCESS: Production